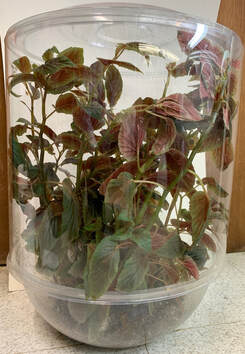
Instructions for adding height to clear bowls used as terrariums to allow taller plants
by Gloria Utzig 09/10/21
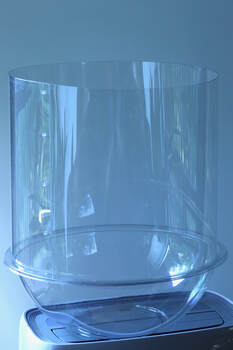
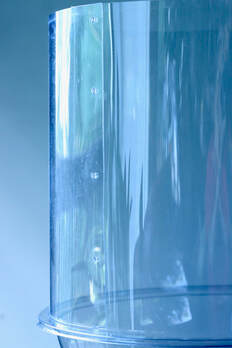
Here is how I made a tube or cylinder to fit the plastic salad bowls that have an inside lip such as those made by Sabert or Fineline in 160 oz. or 320 oz. (available online at www.webstaurant.com). The lids (flat or domed) are available there as well. These are all made of PET (polyethylene terephthalate). The cylinder is made from a polycarbonate sheet that wraps around and sits on the inside lip of these bowls. I first saw Darrin Norton use a similar thing a few years back, and I needed to make these for some of my tall plants. I use acrylic screws to attach the overlap and make the seam less noticeable.
The Polycarbonate sheet used needs to be of a certain thickness so it can stand up on its own, but not be too thick that it cannot bend into a cylinder. Avoid costly sheets with UVA & UVB filtering as plants need these. Sheets can be bought online or at DIY stores (some will even cut them for you). Shop around for pricing.
Materials:
1 320 oz. bowl
1 320 oz. bowl lid or another 320 oz. bowl inverted
1 Polycarbonate Lexan 0.030” thick clear sheet 48” x 24” ($9 to $28 on Ebay, Etsy, DIY stores, etc.)
5 Transparent acrylic screws M3 x 6mm, with nuts, available online (Ebay 25 sets for $1.38, or Amazon)
Tools:
1 sharp box cutter or Exacto knife
1 hand drill with a screw bit size appropriate for screws being used
1 screwdriver and 1 pair of small pliers to hold the nuts
1 metal or wood or cardboard straight edge for marking and then guiding the cutting of the Lexan sheet
1 piece of thick cardboard to use to protect the floor/table where you will be cutting and drilling the Lexan
Bits of clear sturdy tape to temporarily hold the cylinder in place (one that does not leave gooey residue)
1 Marker or gel pen for putting cut and drill marks (that can be wiped off once done)
Directions:
The Lexan sheet comes with instructions on how to cut it, but for starters, do not take off the paper coatings that the sheet has on it until you are done cutting and drilling, as these are there to protect the sheet surface from accidental scratches as you cut and drill it.
The sheet I used was 48 inches long by 24 inches wide, so I nearly split the sheet in half the long way. The total circumference or length for the bowl I used was 46” with an overlap of 2 inches and a height of 13 inches.
FYI, to figure out what length of sheet you will need, you need to figure out the circumference of the inside lip of the bottom bowl where your plant sits. So if a bowl is 14 ¾ inches in diameter-- this measure is across the middle of the bowl but only within the inside lip wall where the sheet will sit - not the outside lip edge. For the 14 ¾” diameter, its circumference would be 14.750 inches x 3.14 = 46.315 inches. To that add at least 1” to 1- ½” so there will be enough of an overlap as each side is brought together to hold the cylinder shape.
Rounding up measurements is fine since I did a final fitting of the sheet with tape before marking and drilling the screw holes for the screws that will hold it together. On the overlap is where transparent screws will be mounted to hold the cylinder together.
You could use wide clear tape instead of screws to bind the edges together to form the cylinder, but you would need to bind both the outside and the inside edge to keep it together so the tape would have to be long lasting, non-yellowing, and more importantly, waterproof.
Lay the Lexan sheet on top of big thick scrap cardboard, or whatever you have that is bigger than the Lexan sheet cuts you will be making. This will prevent damage to the floor/table you will be cutting and drilling the sheet on.
Mark where the cuts on the sheet will be made. Use a straightedge and a box cutter to cut the Lexan strip.
Once cut, you may need another pair of hands or a very sturdy clip, to help you wrap and hold the strip into a cylinder as it sits on the inside lip of the bowl. Temporarily tape the bottom and/or middle or top of the sheet edges in place, while holding the top and bottom edges tightly to make sure the walls are as vertical and even as possible. You want the sheet to sit on its own on that inside lip without gaps.
Put the bowl lid on top of the cylinder to make sure the cylinder is straight. Adjust tape to make sure it sits right.
Mark where the screw holes will be drilled along the overlapping edges. Five screws and nuts seems to be optimal for the 13” height I used. Don’t put screws too close to the edge, as they may cause the sheet to break.
Leave at least ¼” to ½” from the edge to the screw hole to prevent the sheet from cracking, or line the holes up in the very center of the overlap to play it safe.
Remove the taped cylinder from the bowl, and if you can fit a drill inside the cylinder, you can drill both inside and outside edge holes at the same time, or mark both the inside edge and the outside edge of the sheet where the holes will match up, untape the cylinder and drill each edge separately.
Remove just a bit of the tape and the Lexan sheet protector up and down the overlap. Put in the screws and nuts and tighten taking care not to scratch the sheet with the tools.
Remove all the bits of temporary tape, and the Lexan sheet protectors and you are ready to grow!
To get a PDF version of this article click here.


